Essential Hiking Gear Guide: Shelters
Shelter is one of the most elemental human needs.
Maslow includes shelter in his first stage or level of his Hierarchy of Human Needs, the Physiological needs stage. This stage includes the most basic and necessary of needs a human has and must be fulfilled or satisfied in order to move up to the next higher stage and so on; for hiking and backpacking, it is no different.
Shelters and their construction have evolved over the years from the very primitive stick and debris construction to the most elegant and structurally sound techniques in modern housing. Camping and hiking shelter are no different; albeit of a smaller importance to most. We currently have some of the most diverse, versatile, compact, lightweight, roomy, protective shelter options at our disposal. Shelter is home, a comforting place to be and take refuge from inclement weather. A shelter is a place to rest and recharge, where you feel safe and are able to relax. Shelter is essential not only to our life but all life on our planet.
Some of my fondest memories from growing up were going camping every year with my family. Without fail, it rained every, single, year but we could care less. We loaded up my Dad’s grey 1990 Jeep Cherokee Laredo with all of our gear and none was more important to our fun and enjoyment than the three room Coleman tent which was more of a ‘living room’ than a tent. We spent rainy year after rainy year going camping and yet enjoyed ourselves and played cards, told stories and developed sleeping bag fighting, all in our ‘living room’ while the storms and rain carried on outside. The basic structure of the tent, with its built in flooring, rain cover, strong and sturdy poles all helped to provide the safety and comfort we needed. After the many years of endless rain the large Coleman tent started to wear and ultimately dry rotted. Since then we have owned many different style tents but they always bring up fond memories of those early camping days with my family.
One can express their hardiness, personality and outdoor skills bravado all through their shelter choice. The most logical choice for many of us is a tent. Tents are very tried and true. They typically come with a set of support poles but there are also lighter weight versions where one’s trekking pole(s) function as the structural support; both limiting the amount of gear needed but overall resourcefulness of your hiking kit.
I will briefly touch on and discuss the different types of shelters from Tarps, Bivies, Hammocks and then ultimately, Tents.
Tarps
The most basic and minimalistic shelter is a tarp setup. This basic shelter will fend off the rain and snow but will also be susceptible to the cold, wind and the most endlessly annoying nuisance, bugs… Tarps typically do not provide any protection when it comes to wet and soggy ground, and if one plans on using a tarp, I would suggest carrying a ground covering such as a piece of Tyvek to provide some floor protection. Many of the original frontiersmen only had an oil skin tarp for their shelter and it did the job; there are still some modern day frontiersmen which believe in keeping that traditional minimal shelter alive. Tarps now a day are ultra light, super compact, use your own trekking poles or sticks for support and provide the protection perfect for the minimalists out there. Tarps however require some knowledge of tying knots and also rigging, so I definitely some experience is needed to become proficient at their setups.
Hyperlite Mountain Gear Square Flat Tarp
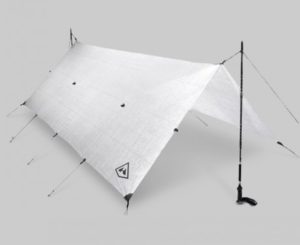
Hyperlite Mountain Gear
This tarp is made with durable and 100% waterproof Dyneema® Composite Fabrics (formerly Cuben Fiber) and with fully bonded seals. Comes in three sizes, 6′ x 8′, 8’6″ x 8’6″ and 8′ x 10′. Has 16 Perimeter tie-outs and 4 tie-outs placed in the center, one-third, and two-thirds of the interior body. Weighing in at only 10 ounces (8’6″ x 8’6″) including guy lines, this tarp offers great flexibility and control in pitching to suit the terrain and/or the weather conditions. But at over $300 this tarp is definitely more expensive than other options. Truly a rock solid minimalist shelter setup if you can afford it.
Mountain Laurel Designs SilNylon Grace Tarp
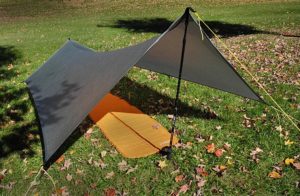
Mountain Laurel Designs
A much cheaper option, at $130 for Solo and $170 for Duo, than the Hyperlite tarp. It has a slightly different”A frame” design but still provides great overall coverage and value for your hard earned dollars. This tarp only has 6 guy lines and that is the bare minimum necessary. Also, the tarp’s A frame style limits the possibilities of where you can set it up but the Grace tarp is great way to try out a true minimalist shelter setup but at the same time not break the bank.
Bivy
A “bivy” is short for a Bivouac (pronounced ‘biv wack’) sack. A Bivouac means an impromptu camp without tents or cover, and was originally utilized by climbers, soliders or mountaineers to have a quick and effective shelter. Now a days a bivy is utilized by minimalist and ultralight hikers / backpackers because of the low weight, minimal setup and efficiency associated with it. A bivy is a step up in terms of overall weather protection from a tarp. In layman’ terms, a bivy to me is basically a protective covering that one slips into and can be protected from the elements and bugs, think: waterproof sleeping bag. Some like this approach because the bivy provides more coverage than a tarp but is way less burdensome than a full tent setup. It’s also used by the military for soldiers in the field. The one huge drawback, which has kept me from ever trying a bivy, is the lack of “headroom.” Most bivies do have some sort of support setup to create a small amount of headroom but some do not and look like a body bag. I know that description is a bit morbid but to someone with claustrophobia, the lack of space can make it a terrible experience. A bivy is a great emergency shelter and one which can definitely go a long way in saving your life if the weather turns quickly and you are stuck in a precarious situation such as being above the tree line.
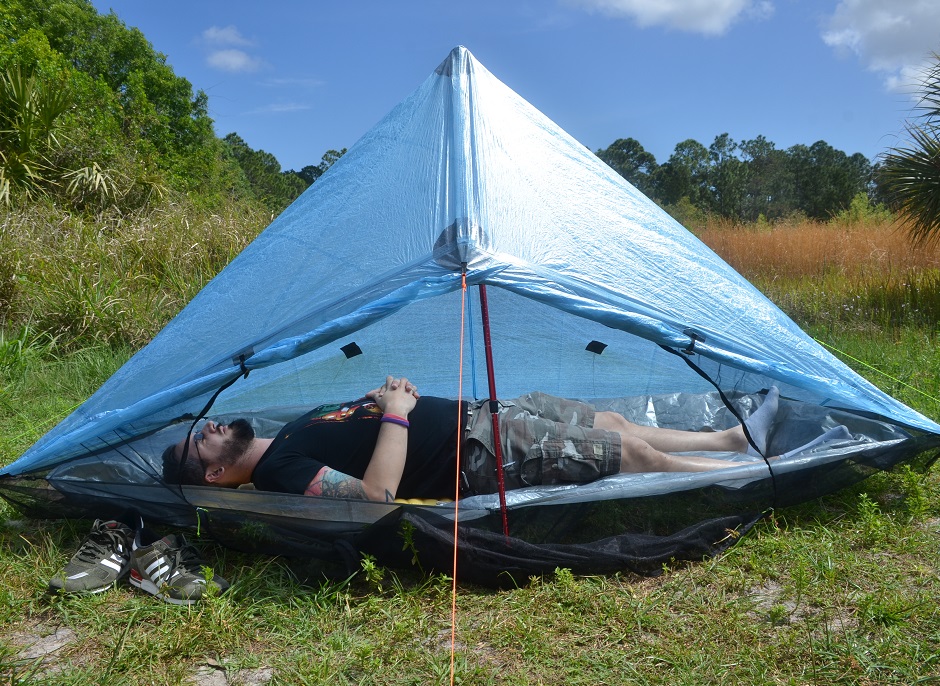
A derivation of a bivy style shelter is a “bug shelter.” A bug shelter does exactly what the name denotes, provides a netted shelter from bugs. Very similar to a bivy setup where you have a floor but unlike most bivies, a bug net shelter usually has attachment points to hang or a pole structure to support the netting off of the occupant as to prevent biting insects from reaching their tasty target. The bug shelter by itself does not have the rainfly covering a normal tent would, so using a combination of a tarp and a bug shelter could be more of an ideal combo than the two separately.
MSR AC Bivy
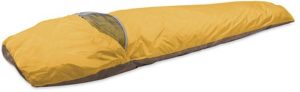
MSR
Nearly waterproof but with the lack of a zipper closure, water could potentially leak in. With no pole support for head room, this bivy would be difficult for claustrophobic people like myself. But for the weight (1lb 16oz) and size (slightly bigger than a 1L Nalgene), this can be a solid option to have in the bottom your pack if bivies are your thing.
Bug Hut Pro 1
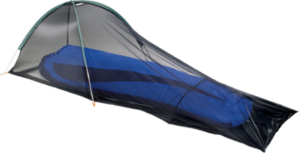
REI
Providing exactly what you would expect from a bug shelter and only for $50. This bug shelter can work great with a tarp or if the weather permits, it can be used by itself. With a pole structure to provide some head room, this self standing setup works well. Weighs in at 1 lb. 5 oz and is treated with insect repellent to help deter critters from messing with you.
Hammock
A hammock shelter set up may sound like the best or worst option for you, depending on your preference. I have found that if you like hammocks, you love them and if you don’t like them, you hate them. The polarization might not be that drastic but overall hammocks are a very unique shelter option and offer differences to the traditional “floor dwellings” which may be attractive to you. I solely used an Eno doublenest hammock and the full Eno setup for my entire Appalachian Trail thru hike
Obviously for starters a hammock is a suspension shelter system which is lifted off the ground, supported by hammock straps connected to two sturdy anchoring points. That aspect makes this shelter very different from the earlier discussed shelters and also from any I will discuss, mainly tents. The benefit of this unique feature is that you are, as you guessed, off the ground! The ground can be wet and for the most part, it will always be tirelessly hard! Sleeping off the ground and having no pressure points allow for a more enjoyable and comfortable sleep (IMHO). Switching to a hammock system definitely takes some getting used to but the more you use it, the more I believe the versatility and benefits shine through.
The basic hammock setup will consist of the actual hammock, which is usually a nylon construction, and the hammock straps, typically sewn [name fabric]. Rainflys, bug nets and equipment hammocks (I will outline my system to easily have a ‘gear hammock’ under my actual hammock with just two carabiners and some paracord in a later post) can be added or taken away as needed. Typically people think that a hammock set up will be lighter than other options but really the weight of the full hammock setup could be lighter but it could also be equal or even heavier, it all depends on if you are comparing the hammock to an ultralight or minimalist shelter set up.
Two major downsides of the hammock besides the normal getting used to sleeping in one, is the heat loss from under the hammock and the lack of a floor. The heat loss is something many people and companies have come with up solutions, mainly under quilts and quilts in general. I never even considered an under quilt because of the cost; sometime 3 or 4 times what the hammock costs. A cheap and effective solution I used during my entire AT thru hike is to use a closed cell foam sleeping pad. That solution is not the most efficient space wise because closed cell foam sleeping pads take up a lot of space but for the money it was worth the effort or affixing the pad to the outside of my pack. Re the floor issue, there is no easy solution to that problem. About a third of the days on my thru-hike, it rained or the ground was already wet. I utilized my poncho has a makeshift floor in order to eat and cook under my Eno pro rainfly but overall the lack of a defined floor can be somewhat of a nuisance.
The major benefit of a hammock shelter setup is the versatility of where you can set up. Obviously the geography will dictate if a hammock is feasible or not, little or no trees and the hammock will be a waste of pack space. But if you have a decent supply of trees where you live or are going to hike, most wooded area will work fine, a hammock can be set up basically anywhere you have two strong enough trees set 15ft or less apart. Rocks, water, 45′ degree slope are no problem for a hammock set up. I really enjoyed the ability to be able to continue hiking until I saw an area where it was a peaceful and relaxing environment where I could hang my hammock. The other thru hikers I spent time with on the AT, and whom have become good friends of mine such as Politician, Aquaman, Pockets, Sunshine, Rabbit, Teton, Alpine, Lint, all used tents during their hikes and had to be more selective in where they could set up mainly because of the ground conditions; not the end of the world but something a hammock setup alleviates.
UA hammock picks:
My strong recommendation is Eagles Nest Outfitters, or ENO, products. I currently have and use regularly an Eno Doublenest hammock, Atlas straps (I will buy their lighter and more efficient Helios straps soon as well), Pro Rainfly and the Guardian Bug Net. I used this setup for the entire AT and didn’t have any major issue or problems with it. The Pro Rainfly, which got some good use and wear due to storms does have some stitching coming undone but nothing some quick hand or machine stitching can’t remedy.
I picked up all of my ENO gear from Amazon, quick links are below:
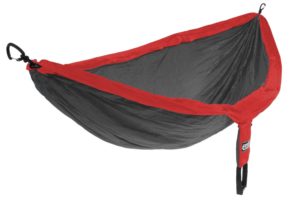
ENO Doublenest Hammock – wider than the ENO Singlenest, meaning it will allow a stomach / side sleeper to lay diagonally and flat enough to get a good night’s sleep. But it can also fit two people or two people and a dog! Below are some pictures from our hammock fun at Liberty State Park, NJ. I used this hammock the entire Appalachian Trail and rarely go out hiking without it. Weight: 19 Ounces; Folded Dimensions: (Dia x L) 4″ x 5″; Unfolded Dimensions: (L x W) 9’4″ x 6’2″.


 , ENO Atlas Straps – chroma (different colors), ENO Atlas Straps – XL, and ENO Helios Straps – I currently own the regular black version. These straps are beasts and can carry up to 400lbs; which works great for couples or larger individuals. They weigh 11 oz and offer 30 combined daisy chain adjustment points. I am going to also pick up the ENO Helios straps for solo trips because they only weigh 5.7 ounces and offer endless adjustability.
ENO Pro Rainfly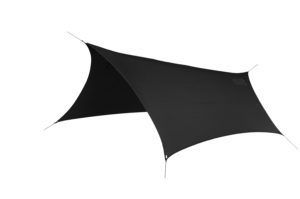 – This rainfly is bigger than most but offers great coverage. Has anchor / tie down points for each of the four corners and works great. I have used this in all type of weather and some serious storms on my thru-hike and beside some stitching coming loose, the rainfly is rock solid. Dimensions: (L x W) 10′ 6″ x 6′ 4″); Weight: 22 ounces.
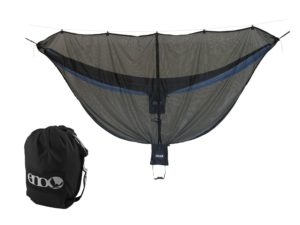 ENO Guardian Bug Net – I will admit I rarely use this but on the nights where evil mosquitos decide you are their dinner, you will wish you have had it. Weighing 16 ounces it is on the heavier side and compacts to a folded size of (L x W x Dia) 4.5″ x 4″ x 3.5″.
The Nube by Sierra Madre Research is another hammock setup which I really find interesting but full disclosure, I have never met anyone or actually used their products myself. The overall concept and design of the Nube with its incorporated rainfly and bug net (which can be rolled up and out of the way) really seems like it could be a very strong performer. They even offer a Nube Floor to take care of ‘no floor’ issue of hammock’ing. I would like to try out the Nube and other Sierra Madre Research products but my current ENO setup up has never failed me and I happy with it. One thing I’ve learned over the years hiking and being outdoors is that you must trust and have faith in your gear; hence my loyalty to the ENO setup.
Many people also use other hammock brands like Hennessy Hammock and their Expedition Series, which is very popular and for good reason, Hennessy makes quality products that are efficient and offer a solid ‘all in one’ hammock setup. But my personal view is that the ‘all in one’ hammock setups like the Expedition Series or the Nube are a little too restrictive in terms of being able to pare down or build up the hammock setup as needed. When the conditions allow, nothing is better than hammock’ing or cowboy camping under the stars. The versatility of being able to piece together each component of your setup will allow you to use the hammock and bug net (or not) during spring and summer months, or just the rainfly with the hammock when rain is expected. Even in cold weather, you can utilize the full setup including the bug net to trap some of your body heat as it radiates within your “zone” to potentially be a little (and I mean a little) warmer. Another major benefit of a hammock setup that is made up of individual components is that you don’t need to carry everything, thus cutting down on the extra weight and saving valuable pack space.
Tents
Tents are probably the most common form of shelter for the typical hiker, backpacker or layperson. The comfort and security provided by being able to fully enclose one’s self from the weather and elements, with a floor to comfortably place some of your gear like your pillow (hiker luxury), get out clothes for tomorrow (hiker tip below) is an ideal picture when most, even myself at times, think about an enjoyable hike.
Hiker tip: place the clothes you plan to wear tomorrow in your sleeping bag before you go to sleep. This will insure that when you wake up in the morning, you are putting on toasty, warm clothes instead of cold, damp ones. That makes all the difference when wanting to take advantage of a crisp and peaceful fall or winter morning.
There are two main types of tents, freestanding and non-freestanding. Freestanding tents come with support poles and can be set up without the use of trekking poles. These tents are more of the common type due to their simplicity but they will be heavier than the non-freestanding type because of the added weight of the tent poles. The non-freestanding tents reduce weight by eliminating the tent poles and instead utilize trekking poles (which if you aren’t currently using hiking poles, I highly recommend everyone try them out) to support the tent. These tents are of similar structure to the freestanding ones but usually geared more toward the minimalist out there. When I am referring to tents in this section, I will be referring to “double-wall” tents. As the name suggests, these tents have an inner tent with a waterproof floor but non-waterproof roof and an outer waterproof covering (rain fly).
Once you decide which type of tent you want, next you will need to choose the capacity or size of the tent. This is measured in the number of people that plan to sleep in the tent. This is another benefit to using a tent as shelter because you can share your shelter with a camping companion instead of each having your own setup. You can also split the weight of the tent and poles among the people who will be sharing it so you can reduce the overall weight that you’re carrying. Solo hikers and their single tents all the way up the multi room family tents cover the possibilities. For backpacking, I would recommend having enough room for yourself and also your gear. Keeping your gear dry and protected from the weather is something I think is important (but ultimately not necessary). The bigger the tent, the heavier it will be, so your earlier decision on going ultra/lightweight or not will also dictate your available choices here as well.
After capacity, the determining the tent seasonality is the next decision which you need to think about. Most tents out in the market today will be 3 season tents (spring, summer and fall) meaning they lighter weight, well ventilated tents suitable for three seasons. They will be able to shed rain and light snow but would not be recommended for very harsh weather and heavier snow. Being well ventilated means that they do not retain the heat as good as some of the 3+ or even 4-season tents which have greater pole support for harsher weather and more fabric (less mesh) to help keep the warmth in. I will focus on the most popular 3 season tents with my recommendations.
Some tents will come with vestibules, which are covered and protected areas outside of the main tent compartment. Typically the entrance or entrances will double as a storage space for your gear and this style of tents can help you utilize a smaller capacity all the while keeping your gear covered and mostly protected.
There are endless options to choose from when looking at tents, so here are some I recommend:
Freestanding Tents
(comes with set of support poles)
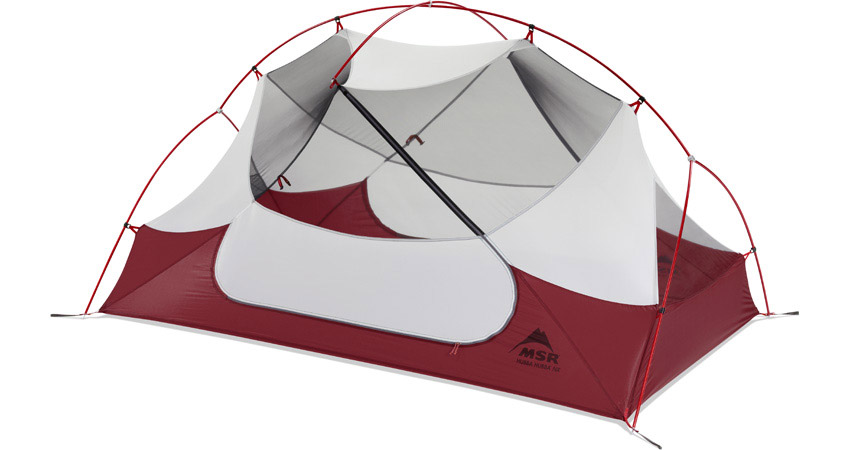
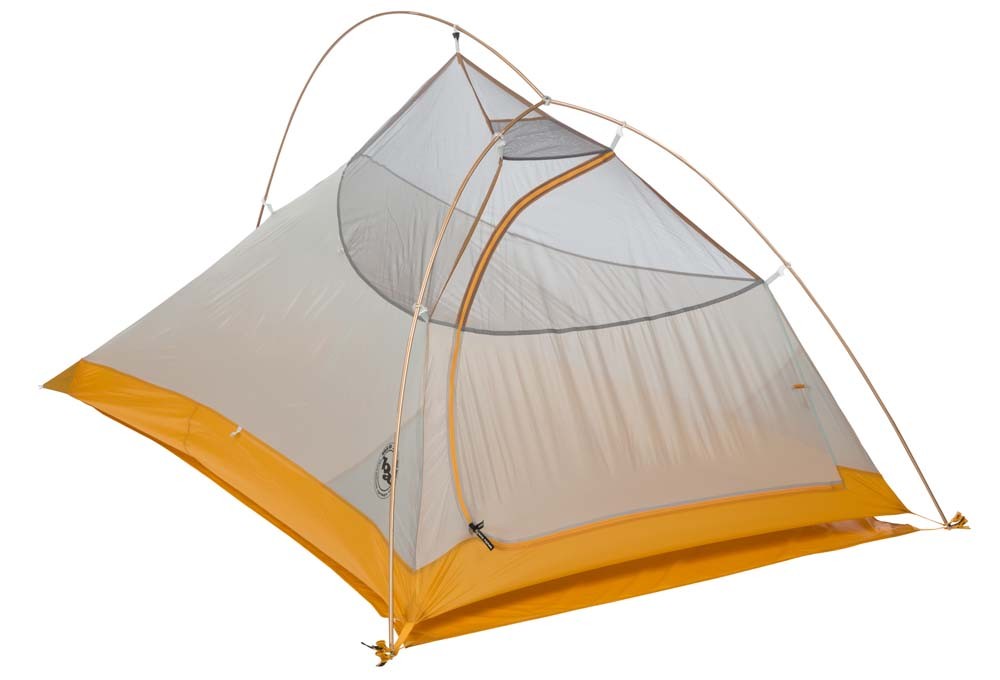
MSR Hubba Hubba NX
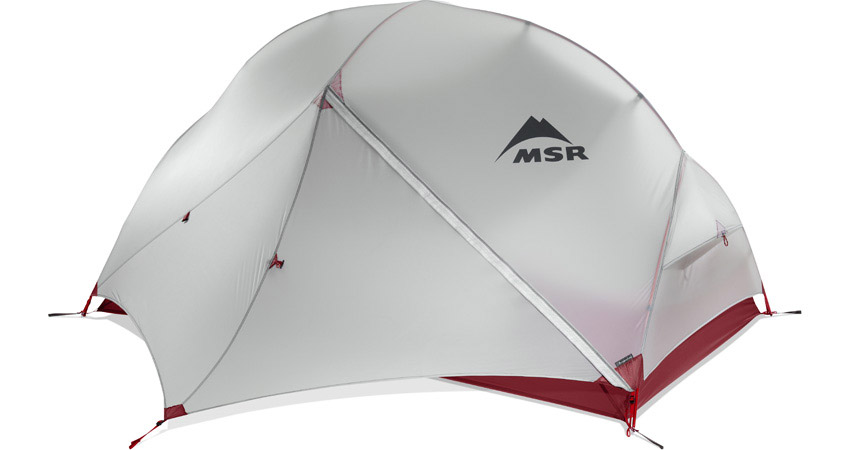
MSR Hubba Hubba NX (2 person) $390, Credit: Cascade Designs
MSR Hubba Hubba NX Without rainfly. Cascade Designs
The MSR Hubba Hubba NX was and is one of the most popular backpacking tents I saw while on the Appalachian Trail. This Hubba Hubba NX version is improved over the previous Hubba Hubba and weighs 3 lb 8 oz; which shaves roughly a 1lb off of the prior version. This is a 2 person tent, dual doors and vestibules, good ventilation and great adaptability. A really cool feature of this tent (and its smaller and larger siblings, the MSR Hubba NX, the MSR Mutha Hubba NX and the MSR Papa Hubba NX) is that you can pitch the tent with or without the rainfly and also it can be pitched with two “fast and light pitching” options; one that requires you to purchase a footprint (MSR Hubba TM footprint, $49) and then a floor-less pitch option where no footprint is required. This adds to the versatility of this tent and the different conditions and setup variations that it can be used for. One draw back to this tent and other similar 2 or 3 person tents, is the larger footprint or space it needs to be pitched correctly. The double vestibule designs means it needs to be staked out properly in order to maintain a tight rainfly pitch and correctly shed weather / rain; which will help prevent high winds from ripping and tearing the rainfly. That space limitation and the durability concern without a proper pitch should be something to consider if you are planning to hike in rockier or more mountainous terrain where properly rigging could be more difficult. Overall, this is a great tent for someone looking for a lighter weight, 3-season tent that can be used in various conditions and for longer hikes / backpacking trips like section or thru-hikes. Outdoor Gear Lab rated this tent near the top of its backpacking tent list and being priced at $390 from Amazon, this tent is slightly cheaper than some of its direct competitors like the Big Agnes Copper Spur UL 2 (which is priced at $430 from Amazon).
The MSR Hubba series also comes in the Hubba NX (1 person version) $265, Mutha Hubba NX (3 person version) $413 and Papa Hubba NX (4 person version) $444.
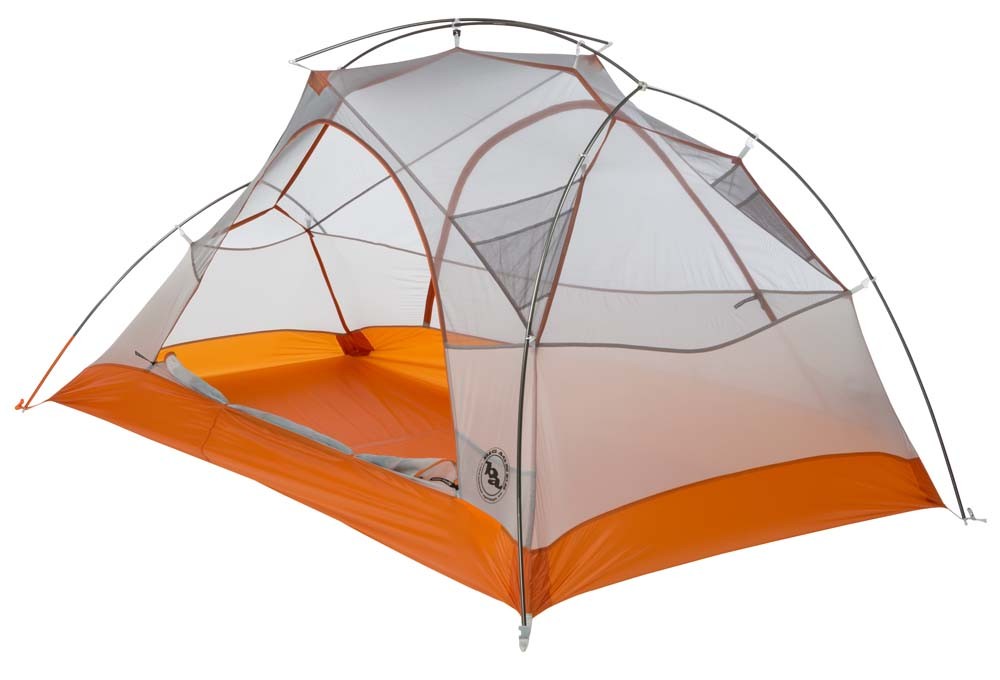
Big Agnes Copper Spur UL2
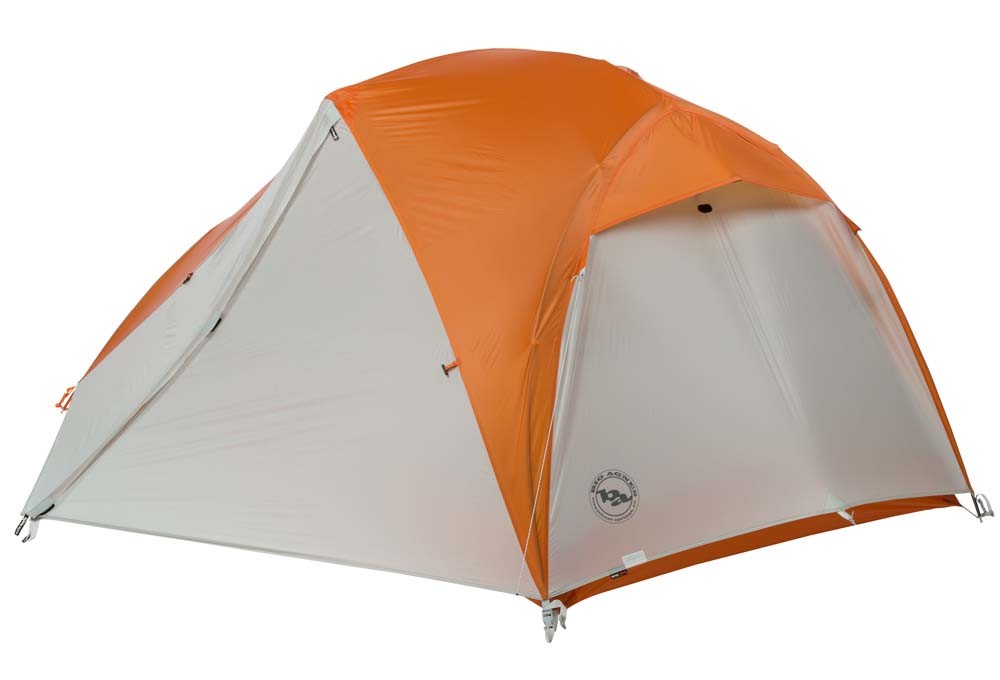
Big Agnes Copper Spur UL2 (2 person) $430, Credit: Big Agnes
Big Agnes Copper Spur UL2 without rainfly, Credit: Big Agnes
As mentioned earlier, another good freestanding tent I have come across a lot on the trail is the Big Agnes Copper Spur UL2. Just like the MSR Hubba series, the Copper Spur tents come in 1, 2, 3 and 4 person capacities. The Copper Spur UL2 is a direct competitor to the MSR Hubba Hubba. Like the Hubba Hubba, the Copper Spur can also be fast pitched but unlike the Hubba Hubba, that can be set up without the footprint, the Copper Spur UL forces you to buy the footprint; which is quite expensive at $70 from Amazon. The Copper Spur UL2 has one of the best weight to space ratios because of its near vertical walls and that design feature makes this tent feel roomier and more luxurious without having any additional weight. This tent weighs in at 3lbs 5oz which is roughly 3oz less than the Hubba Hubba. But one draw back to the spacious lightweight design is that the weight savings come from using very ultralight materials, which are inherently frail. The durability concern is something to think about but it is definitely not the end of the world if you take good care of the tent and make sure it is properly rigged and setup at all times. Beyond the durability concerns, the overall comfort (42in peak height), functionality (dual doors and vestibules, multiple interior pockets) and lightweight design make this tent a no brainer in the backwoods.
The Copper Spur UL also comes in the UL1 (1 person) $356, UL3 (3 person) $500 and UL4 (4 person) $605.
Big Agnes Fly Creek UL2
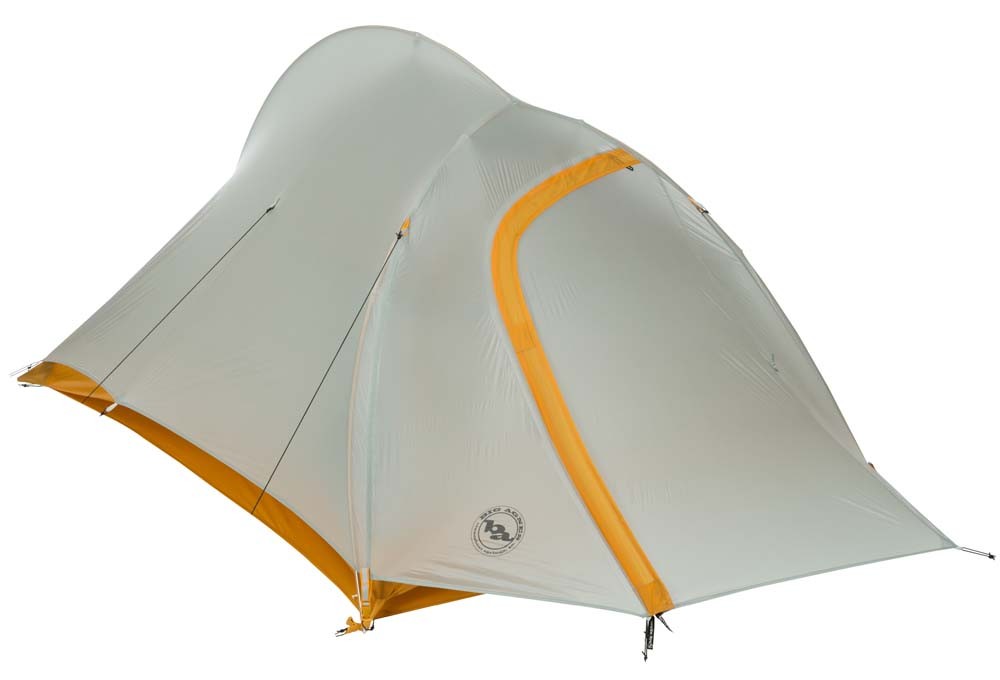
Fly Creek (2 person) $340, Credit: Big Agnes
Fly Creek UL2 without rainfly, Credit: Big Agnes
Another lightweight design from Big Agnes is the Fly Creek series. This series focuses on providing ultralight and very compact tents that are very efficient. However, the one major downside of these tents are their single ridge pole design. In windier conditions, any serious cross winds can collapse the tent due to the single ride pole. Despite that potential downside, on the Appalachian Trail I saw many thru-hikers utilize these tents, mainly the Fly Creek UL1 and Fly Creek UL2 versions due to their overall weight savings and efficiency. Being more ultralight than the Copper Spur UL series, these tents need even more attention and care to make sure they don’t rip or tear while setup or even packed. These tents have less than optimal interior pockets but they do offer a gear loft option which helps store some key essentials. If you are looking for one of the most ultralight freestanding tents and you can deal with chance that the tent may collapse in high winds, look no further than the Big Agnes Fly Creek tents.
The Fly Creek also comes in the UL1 (1 person) $320 and UL3 (3 person) $430.
Non-freestanding Tents
(does not come with support poles)
When looking at top-notch non-freestanding tents, I am going to focus two tents from one of the most preeminent ultralight companies out in the market today, ZPacks. The entire product line up from ZPacks is geared to be the lightest and most compact designs and yet still function and perform well in many conditions. If you speak to any thru-hiker or minimalist backpacker out there, more times than not, ZPacks and their gear will come up in conversation. I personally learned about ZPacks from Will “Redbeard” Wood’s Youtube videos before embarking on my own thru-hike of the Appalachian Trail; specifically from his ZPacks Duplex video. Throughout all of his videos, Will does an amazing job at capturing the trail he is hiking on but also at passing along valuable insights and reviews of his gear. Redbeard’s introduction to ZPacks for me was just the tip of the iceberg. The more and more I hike, the more I come across people utilizing all sorts of ZPacks products.
ZPacks™ Duplex Ultralight Two Person Tent
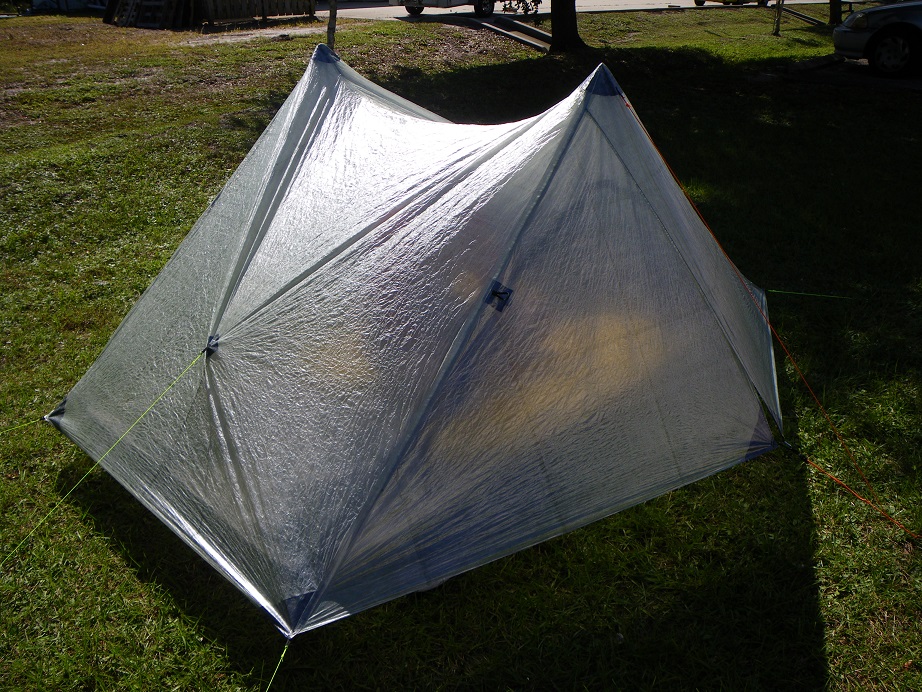
ZPacks™ Duplex UL Tent $600-630, Credit: ZPacks™
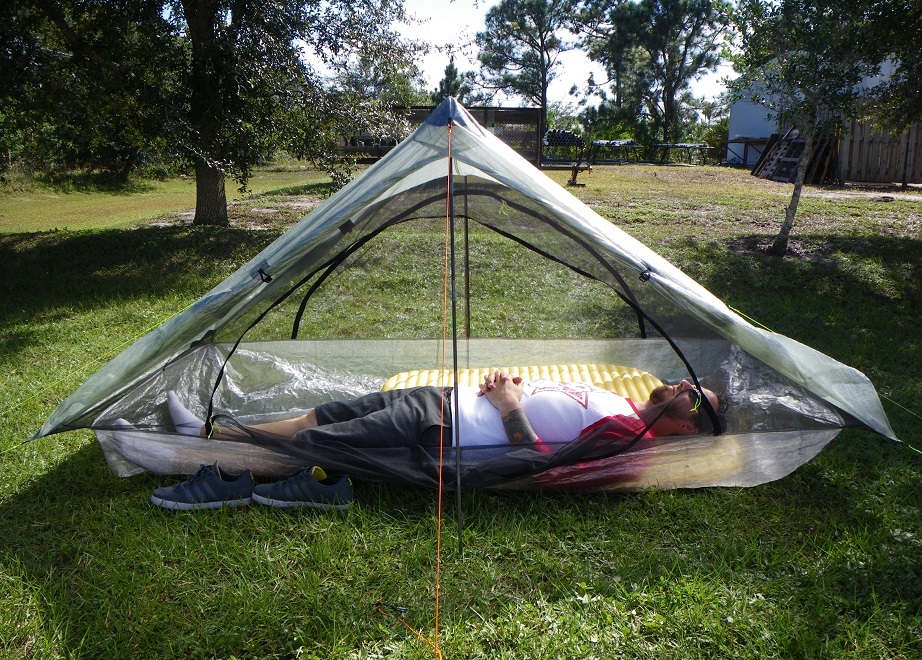
ZPacks™ Duplex UL Tent 6ft 2in person, Credit: ZPacks™
The Duplex tent from ZPacks is probably the best overall non-freestanding tent in my mind. It is incredibly light, at 21oz for the standard Cuben Fiber fabric (weight includes everything you need), but yet roomy enough to fit one hiker and all their gear or even squeeze in another hiking partner. The tent utilizes a “bath tub” style floor which allows for good airflow and ground protection but one note of feedback I heard a couple of times on the trail was that if there is pooling water already on the ground, a hard rain can potentially cause slashes to “jump” up and into the tent through the bath tub mesh. I don’t consider this is a major issue and could potentially be remedied with a tighter, more “closed in” setup. These tents hold us well in windy conditions and now the doors come with plastic toggles which help secure them in windier conditions. Overall, the Duplex has dual doors and vestibules, utilizes two trekking poles for height support, has tons of guy lines to make sure the pitch is tight, very durable but if ripped, easily repaired with their Cuben Fiber repair tape and weighs a crazy low 21oz including the 8 stakes. The price tag is a bit high, ranging from $600 – $630 but you are paying for the uber efficient design and overall weight reduction. After watching Redbeard’s post Appalachian Trail thru-hike Duplex review video, the sheer excitement for anyone looking to go for an ultralight shelter will easily make you forget about the cost of the tent!
You can also buy this tent in 1 and 1.5 person sizes with the ZPacks™ Solplex Tent 1 person $555-585 and ZPacks™ Altaplex Tent 1.5 person $585-615.
ZPacks™ Hexamid Solo-Plus Tent
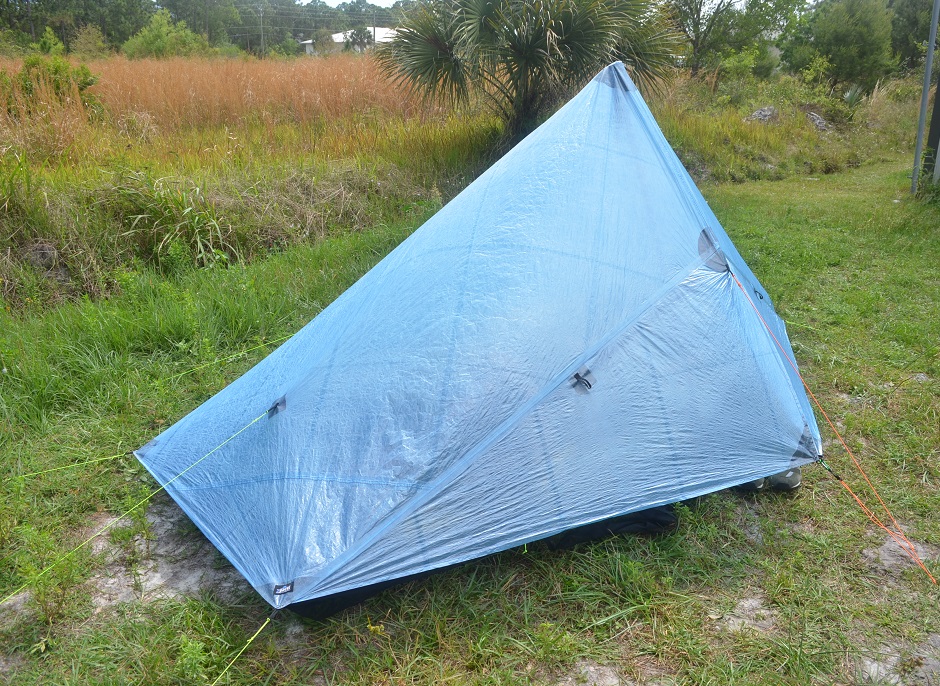
ZPacks™ Hexamid Solo-Plus Tent $445-615, Credit: ZPacks™
ZPacks™ Hexamid Solo-Plus Tent 6ft 2in person, Credit: ZPacks™
This tent is similar to the Duplex except that it has a fully enclosed screen which is good for keeping out all the critters that want to come snuggle. With that said, you will then need to buy a separate bathtub style floor which you would lay on, on top of the screen. The ability to detach the bathtub floor means that you can cowboy camp under the beautiful twinkling stars effortlessly. The solo plus tent is a little bigger than the regular ZPacks™ Hexamid Solo Tent which would fit hikers up to about 6ft. The Solo-Plus allows a regular hiker to shelter comfortably with their gear or even squeeze in another hiker if needed. The total weight for the Solo-Plus Tent, including everything you need is a mere 17.7oz; the Solo Tent is even lighter at just 15.4oz. To give you a good understanding of just how light that is, the Solo and Solo-Plus tents both weigh a little less than two full soda cans. To the minimalist, every ounce counts but to the normal lay person, its like these tents aren’t even in your pack!
You can also buy this tent in a slightly smaller version with the ZPacks™ Hexamid Solo Tent $475-555.
Hope this article helps lay out some of the most common shelter types, and some information about each. This by no means is the only resource you should reference when deciding on their gear. Just like all the other gear choices, the available options should be determined by your ambitions, intentions and preferences. And overall, the most important thing to do is to find a setup that works for you and allows you to take adventures that remind you what life is all about.
True peacefulness is one of the hardest things to find now a days, especially if you live in a city, but some of happiest of people out there are the ones who actively go out in search of it… Escape to the Woods…
Happy Trails as always.
– Six Slash